Monday, January 28, 2013

Project Run and Play Sew Along Week 4

Love is in the Air is the theme for this week at Project Run and Play.  My main inspiration for this week was this super darling stuffed robot toy.  

I couldn't find where it came from, but I did find where someone made one just like it and shared how here.  I started with her measurements traced on paper, but cut one head piece, one body piece and four hand/feet pieces as well as a little heart.  I played around with them on a t-shirt and cut some smaller till I found something I liked.  (I was going to use ric rac for arms, but liked it better without.)  

Head: 1.5 inches square
Body: 2.5 inches square
Arms and Legs: 1 inch square


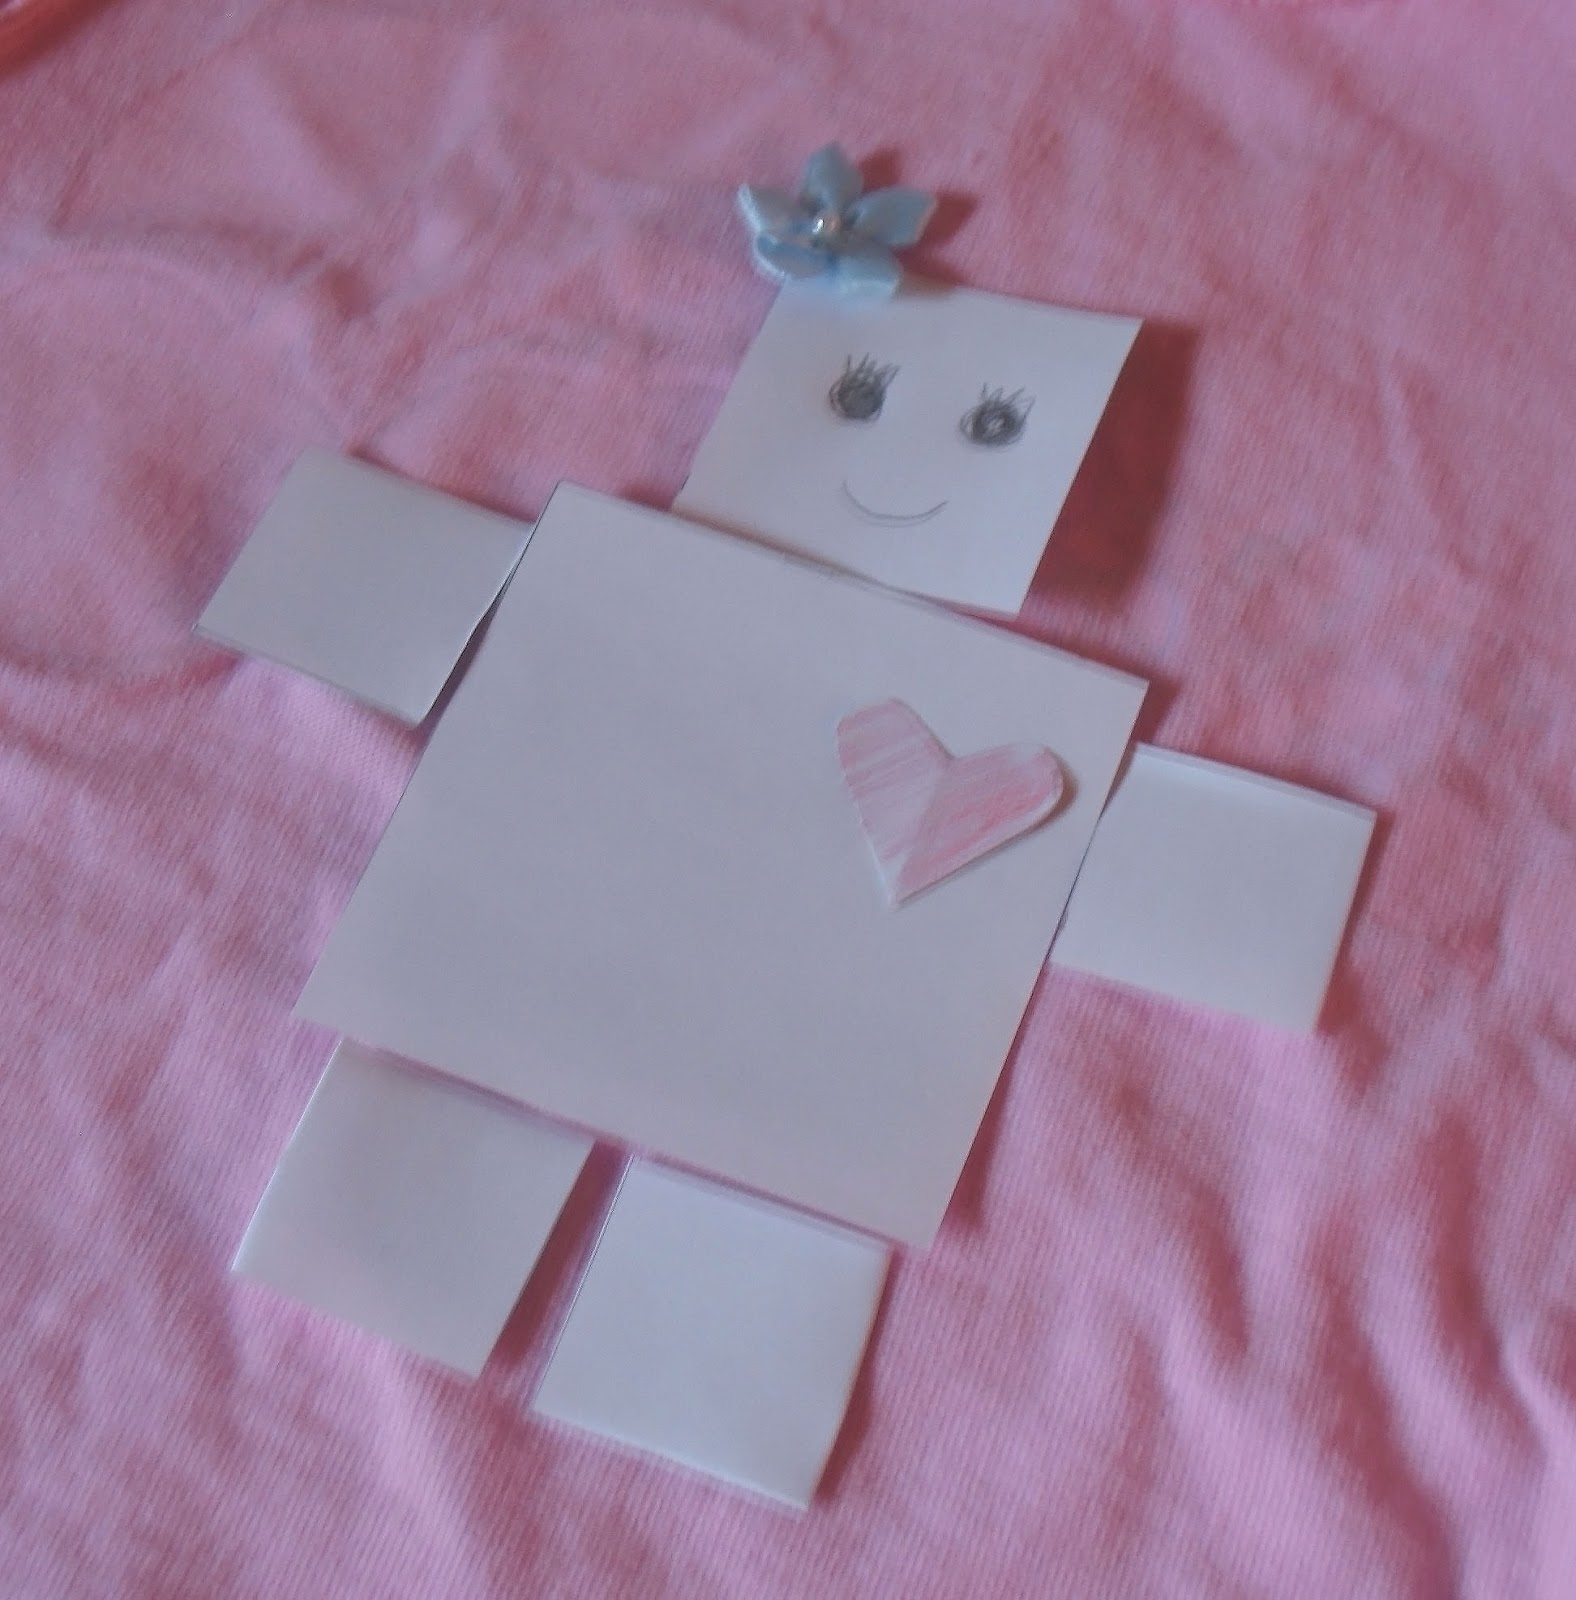
Then I cut those sized pieces from fusible web.  I ironed the body pieces onto some white knit and the heart from a scrap of knit from the shirt and cut those out.  Next, I positioned them in the center of the t-shirt front, stitched them down on the sewing machine.  


For the next part, I used a technique I also found on Pinterest, where she colors in her embroidery with crayon and irons it to set it in.  


I then added buttons for eyes and a bow.  I nearly added a skirt made from ruffled lace, but couldn't make up my mind.  I also used a back stitch with embroidery thread  to make the mouth.


I used the Elise pattern again from Violette Field Threads, this time with the short sleeve option.  I really love it, because it is so fast and easy and fits Eleanor really well.  This will be her third shirt made using it.

For the skirt, I used the pleated skirt tutorial from here.  I've wanted to make it since I first saw it, around the time it was posted.


Source
I made it in the same fabric as the jumper from here.  I'm trying really hard to use it up.


I really like the buttons on the sleeves.


As well as on the skirt.


Wednesday, January 23, 2013

Lonesome for Laurel

This weekend my parents came over a decided to take Laurel with them for some special time.  Eleanor was pretty bummed about it.  She even played with one of Laurel's dolls all day the first day, calling it Laurel.  While I was trying to get some data entry done for camp she told me she needed to make a dress for the doll, so I gave in. 


 I used the same pattern that I blogged about here and let Eleanor choose which view and a fabric.  She picked view two, which is a cute little sundress, and some pink fabric that was some of that tiered fabrics with elastic that are basically instant skirts.  I seam ripped a couple of tiers for the doll dress and with the remaining, it was just the right width for a skirt for Eleanor.


Monday, January 21, 2013

Chore Chart

Soon after the start of the new year, my husband and I put together a chore chart for our girls, to help us be more accountable for having them help routinely.  I looked at lots of free versions and choose one that I thought was really cute and fun and as it turns out the girls think so to.  


It was so easy to put together.  I just printed out all the sheets (two of the chores, since we have two children) and cut out the pieces.  Then I put a little glue stick on the chores to keep them from sliding while I laminated them, cut them out again  actually I got my husband to, hehe) and put a little bit of adhesive magnet strip on the back.


The girls love it!  When we ask if they want to do chores, they cheer and get so excited and run to the fridge to see what they get to do.  Then after they finish it we return to the fridge so they can get their 'scoop' to put on their cones.  We only started with a few to see how it would go and to not overwhelm them, but it is going great so I may add a couple more soon.


If you are curious, we have Eleanor (age 3) feed and water pets, brush hair, make bed, read, pick up toys, and brush teeth.  Laurel  (age 2) does all of those except feed pets, instead she gets to nap.  The next chores I'll add will be clearing and setting the table at each meal.  We already have them help, but it can be a struggle that I hope their chore chart could help fix.

Monday, January 14, 2013

Project Run and Play Sew Along Week 2

The second week's challenge was Stripes and Polka Dots.  I had some striped home decor fabric left over from a Christmas gift last year that I wanted to use.  I knew I wanted to make a jumper with a scalloped hem (for the dots part).  I searched and searched for just the right tutorial or pattern and came upon this one, but I didn't want to pay for a pattern this month, so I went back to my Ottobre Design magazines to see if I could find something similar.  

I settled on an under dress from the 6/2007 issue.  I left off the hem panel, lengthened it and added a scallop hem to my traced pattern pieces.


 I was going to have the stripes horizontal, but it wouldn't fit.  So I had the skirt with vertical stripes and the yokes horizontal.  I'm really loving it.  I think more so than if it had been horizontal.


I blogged about the shirt here and the leggings are what I was going to make for that dress, but didn't.  The pattern is called Fancy Little Leggings by Birdiful Stitches.  They were super easy and could also be made with ruffles.


I got help with how to do the hem from Colette Sewing Handbook by Sarai Mitnick.  The Meringue Skirt in it has the same hem.  I just took a can and traced half circles with a seam allowance onto my pattern piece.  I made sure to have quarter circles at the fold and again with seam allowances at the seams.


Also, this was my first time using Photoshop to edit photos.  I got super irritated with PicMonkey for now charging for features I was able to use not too long ago.  So now I'm fumbling my way around and I would love any tips or links to tutorials that you think would help.

Monday, January 7, 2013

Project Run and Play Sew Along Week 1


This year, I'm really wanting to expand and improve my sewing, so I decided to try to diligently follow along with Project Run and Play, though I'll probably skip week.  The first week's challenge was a pattern remix of The Cottage Home Mama's Party Dress.  My version was inspired by a prom dress I saw on (you guessed it) Pinterest.

Source
To make my version, instead of having a contrast band at the bottom of the skirt, I created two skirts and gathered the top one in 6 places.


 I also used snaps instead of buttons, because I was worried the mystery fabric I was using wouldn't hold up to it.


I love the big bow!


The tutorial was super lovely.  So easy and speedy!


Despite being unsure about the two fabrics I was using, I think it turned out rather well.  It reminds me of sunflowers.


After pictures, Eleanor insisted on staying in her new 'princess dress'.  She was so cute sitting there, I couldn't help taking another picture of her.


Wednesday, January 2, 2013

Crib Front to Fabric Display

Happy new year!  I know a lot of people resolve to be more organized, so I thought I would share how I keep part of my fabric hoard supply tamed (the rest is still very wild).

A while ago, I came up with a really fun way to display some of my fabric.  Shortly after we converted Laurel's crib to a toddler bed, I was trying to figure out what to do with the crib front so that it wouldn't just sit in the closet driving me crazy in the way.  Being a fabric hoarder I tend to have a problem finding a place for all my fabric and keeping it organized.


Somehow I realized I could kill two birds with one simple stone.  I leaned the crib front against the wall and hung a bunch of fabric on the rungs.  Super easy and free!  I thought it was rather clever and pretty.


I also folded some of my larger scraps and put them into a basket with my baker's twine and ric rac.